After recording the initial winding data, perform a
compressed air. Dip the cleaned armature core in a
bar-to-bar test to determine if the winding is lap or wave;
varnish and bake according to the steps in table 7-7,
then record this information on the armature data card.
using a diluted varnish (20 percent varnish, 80 percent
Now you are ready to disconnect and remove the coils.
thinner) of the same type to be used after winding.
This treatment prevents the formation of oxides and
During this process, record the winding data that
forms a base for the adherence of the final varnish
was impossible to obtain before stripping the armature.
treatment.
Remove the banding wires by cutting them in two
places. If banding wires are not used, remove the
wedges in the slots. A simple means of removing the
Winding Armature Coils
wedges is to place a hacksaw blade, with the teeth down,
on the wedge. Tap the top of the blade to set the teeth
in the wedge, and then drive out the wedge by tapping
Formed coils are wound on a coil-winding machine
the end of the blade.
and pulled into the desired shape on the forming
machine. The shape of the coil is determined by the old
Next, unsolder the coil leads from the commutator
coil. The two wires forming the leads are taped with
and raise the top sides of the coils the distance of a coil
cotton or reinforced mica tape. The binder insulation,
throw (distance between the two halves of a coil). The
consisting of cotton or glass tape, is applied to the entire
bottom side of a coil is now accessible, and the other
coil surface.
coils can be removed. Exercise care to preserve at least
one of the coils in its original shape to use as a guide in
The coil is now sprayed with a clear, air-drying
forming the new coils. Next, record the wire size, the
varnish (grade CA), which conforms to Military
number of turns in a coil, and the type of insulation on
Specification MIL-V-1137. After the varnish has dried,
the coils and in the slots.
the coil ends are tinned to ensure a good connection to
the commutator.
The raise the coils without damaging the insulation,
use a small block of wood as a fulcrum resting on the
Preformed windings should be used on large
armature core and a steel bar or piece of wood as a lever.
armatures, but it is more practical to wind small
armatures by hand. End room is very limited, and
After the coil is partly raised, drive a tapered, fiber
wedge between the top and bottom coils within the slot
windings must be drawn up tightly to the armature core.
to finish raising the top coil from the slot. After stripping
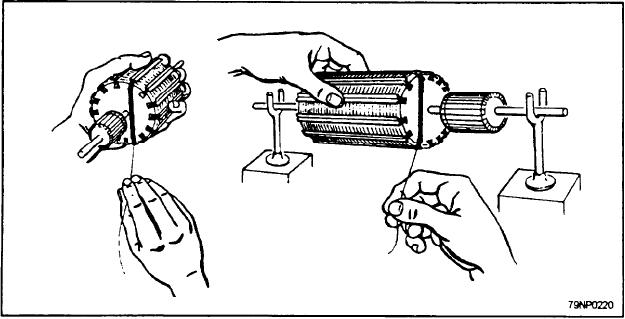
Figure 7-52 shows the methods of winding an armature
the armature, remove all dirt, grease, rust, and scale by
by hand. One armature in the figure is small enough to
sandblasting. File each slot to remove any burrs or
be hand held. The other, too heavy for this, rests on a
slivers, and clean the core thoroughly with dry,
support.
Figure 7-52.--Winding armatures by hand.
7-36

